Monday 31 March 2014
Visual Effects Deformers: Non Linear Deformers
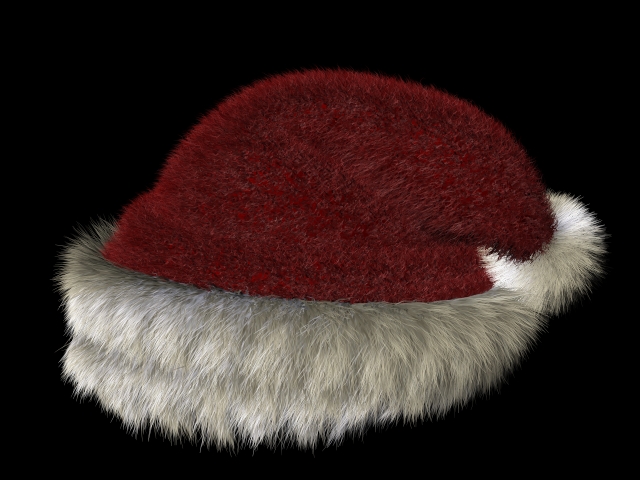
Introduction to Texturing: Fur Hat
In this tutorial, I've learnt how to add fur to the object and upon completing the previously tutorial of maya's fur and attributes, I've understood the concept of fur texturing.
 |
| Lambert Shader Added To The Objects |
 |
| Fur Was Added To Each Component Of The Hat |
 |
| Raytrace Shadow Added To The Light |
 |
| Final Rendered Image of Santa Hat |
Introduction to Texturing: Maya Fur Presets & Attributes
For this tutorial, we were introduced to the presets fur and its attributes. Each attribute was explained and I've learnt how it will affect in the overall image.
 |
| Bear Fur Without Any Adjustments |
 |
| Bear Fur With Adjustments (Self Shader and Light) |
 |
| 100 % Bison Fur |
 |
| 50% Bear & 50% Bison Fur |
 |
| 100% Porcupine Fur |
 |
| 100% Sheep Fur |
 |
| 25% of Bear, Bison, Porcupine and Sheep Fur Each |
 |
| Default Fur Before Checkered Node Was Connected To The Base Colour |
 |
| After The Checkered Was Baked Into The Fur |
 |
| After A Few Adjustments To The Attributes (Scraggle and Clumping) |
 |
| Adding Ramp Node and Connecting It To The Baldness Attribute (Ramp Was Set on Linear) |
 |
| Ramp Node Was Set to None |
After going through the tutorial, we were tasked to create an image after learning with the attributes and this is mine. I've created 2 as I was fiddling with the attributes to understand the differences further.
I have used 25% of Gorilla, Lion Mane, Wet Labrador and Dreadlocks fur. None of the settings were at its preset. I've connected the base colour, tip colour and the specular with the checkered node and all three checkered nodes had different colours to it. I've also connected a ramp shader to the baldness attribute and changing it to be box ramp.


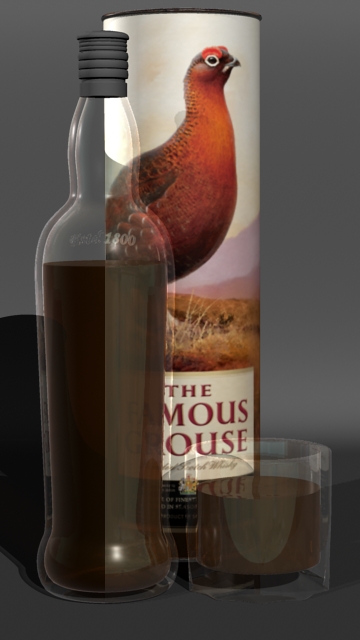
Introduction to Texturing: Sampler Info Node (Transparency)
In this tutorial, I've learnt how to texture a bottle of whisky by adjusting the transparency, refractions and all other necessary attributes to the blinn shader.
 |
| Packaging |
| Transparency Added To The Bottle And The Glass |
 |
| Sampler Info Node Added |
 |
| Before Label Was Added |
 |
| Label Colour Map Brought in From Photoshop AFTER UV-ed |
 |
| After Label Was Added |
 |
| Final Render |
Saturday 29 March 2014
Fantastic Voyage: After Spore Dispersal
For this scene, I have decided to try a crane shot instead of zooming in and out. I prefer the outcome as it gives an edge to the sequence instead of being just flat.
Fantastic Voyage: Gametophyte
Friday 28 March 2014
Fantastic Voyage: Introducing The Sex Cells
Thursday 27 March 2014
@Simon @Jordan Fantastic Voyage: Archegonium (Rendering Problem)
I have modelled, added stroke and animated the archegonium to unfold.
 |
| Figure 1 |
 |
| Figure 2 |
 |
| Figure 3 |
Figure 1 and 2 are rendered using Maya Software and the outline (toon shader is used) appears but when I tried rendering using Mental Ray, it doesn't appear. I have tried looking into tutorials and I could only bake it to my object, which I needed to do the deformation. A solution was to convert the paint effects to polygons but by doing that, it has increased my polygon counts in my scene tremendously and also it will freeze the outline from one perspective.
Fantastic Voyage -Phrase Fold Out Test
Still Life Drawing Lesson 14
For this week's drawing class, I have decided to let loose and just draw an interpretation of what I see.


As I kept turning my paper and added more elements to my drawings, three faces seem to have formed with the lines and shapes that I've added to it. It also seems that these three characters have different personalities. The Left one seems to be drunk, the center is mean and the right one is cheeky! :D

This was just another quick drawing using a pen and it looks like someone is sitting at the edge, thinking :D

Wednesday 26 March 2014
Fantastic Voyage: Final Fern Model & Texture
 |
| Model of Leaf and UV mapped it |
 |
| Underside of the Fern Frond |
 |
| Fronds Texture Test |
From different angles, the fern ffronds looked fine as seen from the Texture Test but when it comes to the bottom view which I am after, it looked too lined up. I have decided to move around the line up so that it looks more like concept art.
 |
| Fern fronds that are too Lined Up |
 |
| Final Fern Fronds |
Fantastic Voyage: Fern Fronds
These are my fern fronds that I did. I used the Toon Paint Shader along with the outlines and I am happy with the results as this is what I am going for. I am going to experiment and fiddle with the settings further to see what else I can achieve out of it.


Tuesday 25 March 2014
Fantastic Voyage: Book (Rigged & Skinned)
Cutting Edge Film Programme: The Usual Suspects (1995)
 |
| Figure 1: Movie Poster [Still Image] |
Unhappy that they have been accused for a crime that neither of them
committed, they came to an agreement to seek revenge against the New York’s
Police Department. Their first crime is to hijack a New York Taxi Service. It
is a service run by corrupted officers who escorts smugglers to their
destinations around the city. It was a success. Following that successful
crime, Keaton wanted to come clean and be disassociated with all criminal
activities as he dreams of starting anew only finds himself deeper into the
crime world. This is when he and the rest met with Kobayashi, a man who works for the
mysterious, influential boss from the underworld known as Keyser Söze. None of
them had a clue that a crime they had previously committed had an association
with Keyser Söze. They had crossed his path at the wrong time and now, they
have been commissioned by him to redeem themselves.
 |
| Figure 2: Hijack Scene [Still Image] |
The interesting storyline is a contributing
factor to the success of the film but the great sound and cinematography helps
piece everything together. An example of great use of sound and imagery
together would be when the camera pans across following the airplane. The sound
used in this shot, which was fast and has an increasing tempo evokes a feeling
of danger and trouble. The back shot of the plane seems to look like a shark
and as sharks are usually associated with danger, this is an example of how it
has successfully portrays danger with the usage of great sound and visuals. It
also follows through on to the next scene because it was the arrival of a
smuggler who was escorted by the corrupted officers from the New York Police
Department. This was possible because of the film’s talented editor, John
Ottman. Ian Nathan credits and highlights the work of John accurately when he
states “Plaudits aplenty must also
go to editor/composer John Ottman for his skillful manipulation of image
and sound.” (Nathan, 2006)
 |
| Figure 3: Back View Of Plane Landing [Still Image] |
 |
| Figure 4: Back View Of A Shark [Still Image] |
In addition to the perfect synchronization of the
sound and the visuals, Singer used various camera angles to emphasise a point
in a scene. The use of close ups to see
the bottom of the coffee mug and various elements from the bulletin board in
Sergeant Jeffrey office was important to help understand and piece the
information from Verbal’s testimony. Mitchell reiterates this point when he says “He uses skilful camera movement and editing to make
us see what’s going on in Kujan’s mind and thus to identify with him as he
realizes how he's been fooled.” (Mitchell, 2000)
 |
| Figure 5: Close Up Of The Coffee Mug [ Still Image] |
 |
| Figure 6: Close Up Shots Of Kajun [Still Image] |
In
conclusion, the exceptional performance by the cast completes the package of it
being a great, successful film. Berardinelli is accurate when he states “The Usual Suspects is an accomplished synthesis of noir elements and, as
such, is an entertaining entry to the genre.”(Berardinelli, 1995). The famous quote from the
film, which was “The greatest trick the Devil ever pulled was convincing the
world he didn’t exist.”(Verbal, 1995) concluded the third act beautifully
because like the devil, the story that Verbal told Kujan has successfully
convinced him and the audience for half the film that he was truly innocent and
that Keaton was the puppeteer; pulling the strings and taking advantage of the
other criminals.
List of Illustrations:
List of Bibliography:
List of Illustrations:
Figure 1 The Usual Suspects (1995) [Poster] at http://www.boettcherproductions.com/MySingleEntry/Library/Images/287.jpg (Accessed on 25 March 2014)
Figure 2 Hijack Scene (1995) [Still Image] at http://static.rogerebert.com/redactor_assets/pictures/far-flung-correspondents/too-much-frosting-not-enough-cake/Usual_20Suspects_203.jpg (Accessed on 25 March 2014)
Figure 2 Hijack Scene (1995) [Still Image] at http://static.rogerebert.com/redactor_assets/pictures/far-flung-correspondents/too-much-frosting-not-enough-cake/Usual_20Suspects_203.jpg (Accessed on 25 March 2014)
Figure 3 Back View Of Plane Landing (1995) [Still Image] at http://www.byrneholics.com/wp-content/uploads/2011/11/usual-suspects-screencap-79-crop.jpg (Accessed on 25 March 2014)
Figure 4 Back View Of A Shark [Still Image] at http://www.seaquestdivecenter.net/wp-content/uploads/2012/11/Thresher_shark_Seaquest_Philippines-c.jpg (Accessed on 25 March 2014)
Figure 5 Close Up Of The Coffee Mug (1995) [Still Image] at http://staticmass.net/wp-content/uploads/2012/06/usual_4.jpg (Accessed on 25 March 2014)
Figure 6 Close Up Shots Of Kajun (1995) [Still Image] at http://staticmass.net/wp-content/uploads/2012/06/usual_4.jpg (Accessed on 25 March 2014)
List of Bibliography:
Berardinelli, James (1995) The Usual Suspects (1995) At http://www.killermovies.com/u/theusualsuspects/reviews/2bl.html (Accessed on 25 March 14)
Mitchell, David (2000) Sound Lies - Achieving Closure In The Usual
Suspects At: http://www.zenoshrdlu.com/zenosusp.htm
(Accessed on 25 March 14)
Nathan, Ian (2006) The Usual Suspects (1995) At: http://www.empireonline.com/reviews/reviewcomplete.asp?FID=132353
(Accessed on 25 March 14)
IMDB Quotes(1995) The Usual Suspects (1995) At: http://www.imdb.com/title/tt0114814/quotes
(Accessed on 25 March 2014)
Monday 24 March 2014
Fantastic Voyage: Animating The Book
Now that I have book modelled as I wish, I am looking at how to animate this book. I've watched tutorials and it's suggested that I do rigging and skinning which I would be on to next.
 |
| Book Development |
 |
| Book Development 2 |
 |
| Book Development 3 |
 |
| Final Book |
Subscribe to:
Posts (Atom)